htmx 소개
July 18, 2024
소개
htmx는 기존 js 의 ajax 호출 동작 이후 화면 갱신을 하는 구현 패턴와 달리, html 마크업 레벨에서 이를 지원하여 화면을 구성하는 구조를 가지는 프론트엔드 웹 프레임워크 이다.
html의 attribute 을 활용하여, html에서 직접 ajax, css transitions, websocket, sever send event 등을 컨트롤 한다.
추가적인 특징
- htmx 프레임웍 크기는 (~14k min.gz’d) 정도로 작다.
- dependency-free 이다. (응용하기에 따라 다른 frontend fw와 함께 사용이 자유롭다, node.js에서도 사용가능)
- 확장 가능한 구조를 가진다. (extendable)
- 동일 기능 구현시 js가 줄기 때문에 코드 사이즈를 줄여준다. (67% when compared with react)
- 0BSD(Zero-Clause BSD) 라이선스 로 자유롭게 사용 가능하다.
- 현재(2024.07.18)기준 가장 최신 버전 - v2.0.1
- 2020년에 시작된 프로젝트이다, 최초커밋(문서가 약간 부실하다), 2022년 intercooler.js 로부터 프로젝트 명칭을 변경(htmx)하여 (v1.8.0)출시하였다.
motivation
- Why should only
<a>&<form>be able to make HTTP requests? - Why should only
click&submitevents trigger them? - Why should only
GET&POSTmethods be available? - Why should you only be able to replace the entire screen?
위와 같은 제약 조건을 제거하여, htmx가 HTML을 hypertext 로 지원 하겠다는 철학.
기본적인 구현방식
  <script src="https://unpkg.com/htmx.org@2.0.1"></script>

  <!-- have a button POST a click via AJAX -->
  <div hx-get="/clicked" hx-trigger="click" hx-swap="outerHTML">
    Click Me
</div>- hx-post - trigger 조건 발생시,
/clickedapi 을 get (ajax) 한다. - hx-trigger - trigger의 조건을 결정한다. 위 예시 코드에서는 click 이다.
- hx-swap -
/clickedapi응답을 사용하여, target의 html을 갱신 한다. 위 예시 코드에서는 outerHTML의 내용을 갱신 한다.
AJAX
| Attribute | Description |
|---|---|
| hx-get | Issues a GET request to the given URL |
| hx-post | Issues a POST request to the given URL |
| hx-put | Issues a PUT request to the given URL |
| hx-patch | Issues a PATCH request to the given URL |
| hx-delete | Issues a DELETE request to the given URL |
- get, post, put, patch, delete 을 제공한다.
Trigger
<input name="q"
       hx-get="/search" hx-trigger="keyup changed delay:1s"
hx-target="#search-results"/>- key, click, load 등 여러형태의 trigger 을 제공하고, delay와 같은 기능들도 제공한다.
- 상세내용은 공식 문서를 참고 - https://htmx.org/attributes/hx-trigger/
Core Attribute
| Attribute | Description |
|---|---|
| hx-get | issues a GET to the specified URL |
| hx-post | issues a POST to the specified URL |
| hx-on | handle events with inline scripts on elements |
| hx-push-url | push a URL into the browser location bar to create history |
| hx-select | select content to swap in from a response |
| hx-select-oob | select content to swap in from a response, somewhere other than the target (out of band) |
| hx-swap | controls how content will swap in (outerHTML, beforeend, afterend, …) |
| hx-swap-oob | mark element to swap in from a response (out of band) |
| hx-target | specifies the target element to be swapped |
| hx-trigger | specifies the event that triggers the request |
| hx-vals | add values to submit with the request (JSON format) |
- html의 attribute로 제어하기 때문에 다양한 attribute을 제공한다.
- 자세한 부분은 공식 문서 참고 - https://htmx.org/talk/#attributes
Javascript API
  // add the class 'myClass' to the element with the id 'demo'
  htmx.addClass(htmx.find('#demo'), 'myClass');

  // add the class 'myClass' to the element with the id 'demo' after 1 second
htmx.addClass(htmx.find('#demo'), 'myClass', 1000);- helper형태의 javascript api도 제공된다.
- 자세한 부분은 공식 문서 참고 - https://htmx.org/api/
기타
-
Essays 을 통하여, Hypermedia application 에 대한 내용 및 htmx의 밈등을 소개하고 있다.


실습해보기
아래와 같은 간략한 코드를 활용하여, 실습 해본다.
해당 실습은 - https://htmx.org/examples/click-to-load/ 을 직접 구현해본 케이스 이다.
-
index.html 와 /contents api을 제공하기 위한 간략한 node.js 서버
const http = require('http'); const url = require('url'); const fs = require('fs'); const path = require('path'); const hostname = '127.0.0.1'; const port = 3000; const server = http.createServer((req, res) => { const parsedUrl = url.parse(req.url, true); const getRandomItem = (arr) => { // 배열 길이를 기준으로 무작위 인덱스를 생성 const randomIndex = Math.floor(Math.random() * arr.length); // 무작위 인덱스의 아이템을 반환 return arr[randomIndex]; } // 요청 URL이 /contents 인 경우 if (parsedUrl.pathname === '/contents') { // 응답 헤더 설정 res.writeHead(200, { 'Content-Type': 'text/html' }); // 응답 데이터 const names = ['Yumbeni', 'Butterful', 'DDogas', 'Pikachu', 'Majayoung']; const contents = `<tr id="replaceMe"></tr><tr><td>${getRandomItem(names)} Test...</td><td>${Date.now()}</td></tr>`; // HTML 형식으로 응답 전송 res.end(contents); return; } // 요청 URL이 / 또는 /index.html인 경우 if (parsedUrl.pathname === '/' || parsedUrl.pathname === '/index.html') { // index.html 파일 경로 설정 const filePath = path.join(__dirname, 'index.html'); // 파일을 비동기적으로 읽기 fs.readFile(filePath, 'utf8', (err, data) => { if (err) { // 파일 읽기 오류 처리 res.writeHead(500, { 'Content-Type': 'text/plain' }); res.end('500 Internal Server Error'); } else { // 성공적으로 파일을 읽었을 때 응답 전송 res.writeHead(200, { 'Content-Type': 'text/html' }); res.end(data); } }); return; } // 404 Not Found 처리 res.writeHead(404, { 'Content-Type': 'text/plain' }); res.end('404 Not Found'); }); server.listen(port, hostname, () => { console.log(`Server running at http://${hostname}:${port}/`); }); -
실습(htmx)코드 - index.html
<html> <head> <script src="https://unpkg.com/htmx.org@2.0.1" integrity="sha384-QWGpdj554B4ETpJJC9z+ZHJcA/i59TyjxEPXiiUgN2WmTyV5OEZWCD6gQhgkdpB/" crossorigin="anonymous"></script> </head> <body> <table> <thead> <tr><th>Name</th><th>ID</th></tr> </thead> <tbody> <tr id="replaceMe"></tr> <!-- button area --> <tr> <td colspan="2"> <div class='btn primary' hx-get="/contents" hx-target="#replaceMe" hx-swap="outerHTML" > Load More Contents... </div> </td> </tr> </tbody> </table> </body> </html> -
해당 실습 코드로 실제 구동하면, 아래와 같이 html내에 별도의 js없이 정상적으로 동작하는 것을 확인 할 수 있다.
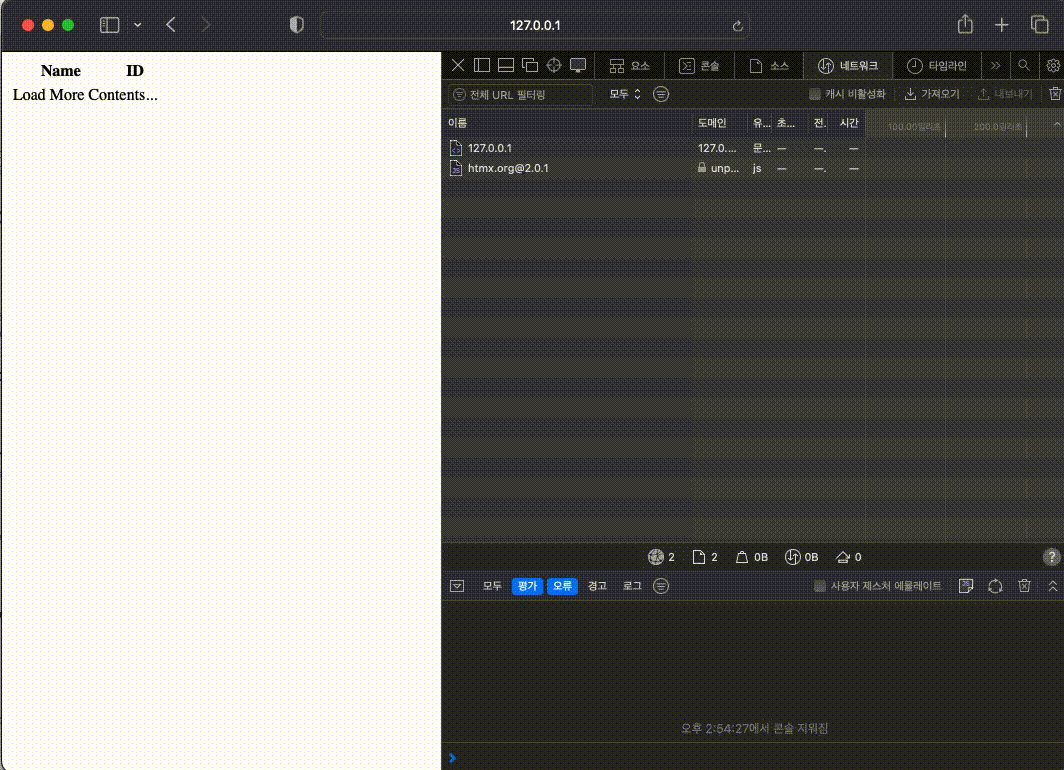
-
실질적인 size

- htmx.min.js 가 20kB에 index.html이 880B로. 실질적으로 21kB 수준으로 구현되어있다.
- 아주 간략한 기능인데 해당 부분을 react나, vue로 구현한 케이스를 가정하면, 실질적으로 js가 많이 줄어 들 수 있을꺼 같다.
- 하지만 반대로, 본 연습 코드에서는 node코드에서 html str을 생성하여, 기존 json형태 대비 로직 증가 및 res data 증가 등이 추가될꺼 같다.
요약 및 느낀점
- 현재 frontend 개발 방법의 패러다임에서, html 을 markup이 아닌 language로 접근 하는 재미있는 framework.
- 사실 간략한 구현의 경우, ssr, rehydrate 등이 과할 수 있는데 이럴때 simple 한 해결책의 하나가 될 수 있을듯!
- htmx사용시 일부 구현에서는, 마치 구 jsp처럼, api의 응답이 json 형태의 data가 아니라. 실제 화면에 bind되어서 그려질 html string set 이 되어야 할 수도 있다.
- 클라이언트의 javascript의 내용이 줄어드는 만큼 경우에 따라서 서버의 로직 비용의 증가가 있을 수 있다.
- 실제 프로젝트에서는, 무조건적인 적용이 아니라 케이스에 따라서, 관리나 구현 복잡도 등을 고려하여서 적용하는게 좋을듯!!
참고
- home - https://htmx.org/
- doc - https://htmx.org/docs/
- git - https://github.com/bigskysoftware/htmx
- wiki - https://namu.wiki/w/htmx